
As temperatures rise, your air conditioning system becomes one of the most vital appliances in your home. But what happens when it starts acting up? Many common AC issues can be diagnosed—and even fixed—without immediately calling in an HVAC expert. Understanding the basics of AC troubleshooting not only saves time and money but also helps ensure your cooling system runs efficiently all season long.
Before picking up the phone to schedule a service appointment, consider this guide to identifying and resolving the most frequent air conditioning problems through simple DIY maintenance steps.
1. Start With the Basics: Check the Thermostat
One of the first and most overlooked steps in AC troubleshooting is ensuring your thermostat is working properly. A misconfigured or malfunctioning thermostat can cause a host of problems, from inconsistent temperatures to a complete lack of cooling.
Thermostat Calibration
If your thermostat is not accurately reading your room’s temperature, it might not trigger the AC system when needed. Incorrect thermostat calibration can lead to uneven cooling, excessive cycling, or the unit failing to turn on. Make sure:
- It’s set to “cool” and not “fan” or “heat.”
- The temperature setting is lower than the current room temperature.
- Batteries (if applicable) are fresh.
- The unit is level on the wall and not near heat sources like lamps or direct sunlight.
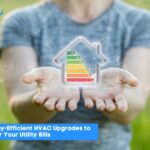
If your thermostat is outdated, consider upgrading to a programmable or smart thermostat for better temperature control and energy consumption monitoring.
2. Replace or Clean the Air Filter
A clogged or dirty filter can restrict airflow, making your AC work harder and less effectively. Reduced airflow leads to warmer air, longer run times, and increased wear and tear on your system.
Filter Replacement
Inspect your air filter monthly during the cooling season and replace it at least every 1 to 3 months. Homes with pets, smokers, or allergy sufferers may need more frequent changes. Filter replacement is one of the easiest and most effective steps in home DIY maintenance for better cooling performance.
3. Inspect the Circuit Breaker and Power Supply
If your AC isn’t turning on at all, the issue might be electrical. Head to your electrical panel and check whether the breaker connected to your AC unit has tripped. If so, reset it—but if it trips again shortly after, that could signal a deeper issue that requires a HVAC expert.
Make sure:
- The thermostat has power.
- The outdoor unit (condenser) is plugged in and receiving electricity.
- The disconnect switch near the unit is set to “on.”
4. Check Air Vents and Ductwork for Blockages
Blocked or closed vents can lead to uneven cooling throughout your home. Take a walk through each room and ensure all vents are open, clean, and unobstructed by furniture or curtains.
Airflow Optimization
Poor airflow can cause your AC system to underperform, creating hot and cold spots around your house. In some cases, dirty or leaking ductwork may be to blame. While more complex duct issues may require professional repair, you can:
- Vacuum dust from accessible vent openings.
- Use a flashlight to inspect visible ductwork for signs of damage or blockages.
- Seal minor leaks with aluminum HVAC tape.
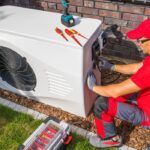
5. Clean the Outdoor Unit
The outdoor condenser unit plays a crucial role in heat exchange. When it’s covered in dirt, leaves, or grass clippings, the system can’t properly release heat, reducing efficiency and potentially causing the system to overheat.
Condenser Coil Cleaning
Turn off the power before doing any work on the unit. Then:
- Remove debris around the base of the unit.
- Use a soft brush or vacuum to gently remove dirt from the fins.
- Spray the coils with a garden hose (not a pressure washer) from the inside out.
Routine condenser coil cleaning improves energy efficiency, reduces energy consumption, and extends the life of your AC.
6. Look for Refrigerant-Related Issues
Low refrigerant levels can severely impact your AC’s ability to cool your home. Unfortunately, refrigerant is not something you can safely handle yourself—only a certified HVAC expert should manage refrigerant diagnosis and recharging.
Warning Signs of Refrigerant Problems:
- Warm air blowing from vents
- Ice buildup on the refrigerant line or evaporator coil
- Hissing or bubbling noises near the unit
- Increased energy consumption with reduced cooling performance
If you suspect a refrigerant issue, it’s time to call a pro.
7. Listen and Observe for Unusual Noises or Smells
Rattling, grinding, or buzzing sounds can be early indicators of mechanical problems. A musty smell may signal mold in the ductwork or a dirty evaporator coil. A burning odor could suggest electrical issues.
Turn the system off immediately if you detect something abnormal and consult a professional to prevent further damage.
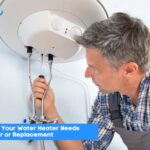
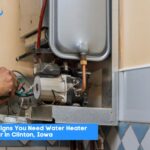
8. Assess Your System’s Age and Maintenance History
If your AC unit is more than 10–15 years old and has required frequent repairs, it may be time to consider replacement. While some problems are easy to fix, older systems often experience decreased efficiency and more frequent breakdowns.
Regular DIY maintenance combined with annual professional inspections will help extend your system’s lifespan and reduce emergency repairs.
FAQs
Why is my AC blowing warm air?
There could be several reasons, including incorrect thermostat settings, a dirty filter, low refrigerant levels, or a malfunctioning compressor. Start by checking the thermostat and air filter before calling an HVAC technician.
How often should I clean or replace the air filter?
You should check your air filter every month and replace it every 1 to 3 months depending on usage, environmental factors, and household conditions (like pets or allergies).
When do I need a professional to check refrigerant levels?
If your AC is blowing warm air, you see ice forming on the coils, or you hear hissing sounds, low refrigerant may be the issue. Refrigerant requires special handling and should only be serviced by a licensed HVAC professional.
Can thermostat issues cause major cooling problems?
Absolutely. A miscalibrated or malfunctioning thermostat can prevent your system from turning on, cause uneven cooling, or make the unit run longer than necessary. Calibration or replacement is a quick fix that can restore comfort and efficiency.
Conclusion: Know When to DIY and When to Call for Help
Many common AC problems stem from simple issues like a dirty filter, incorrect thermostat settings, or blocked vents. With a bit of DIY maintenance, you can resolve these on your own and restore comfort to your home without incurring unnecessary service fees.
However, issues involving refrigerant levels, electrical components, or mechanical failures are best left to a licensed HVAC expert. Regular preventative care, such as filter replacement, condenser coil cleaning, and thermostat calibration, will keep your AC unit running efficiently and help avoid costly repairs in the long run.
By becoming familiar with these AC troubleshooting steps, you can take a proactive approach to home comfort and save time, money, and stress when the next heatwave hits.